Royal School of Needlework - Certificate and Diploma
In January 2023 I enrolled at the Royal School of Needlework to study for their Certificate and Diploma in Technical Hand Embroidery. Since the pandemic it has been possible to study by Zoom and that is what I am currently doing. Each embroidery has to be mounted and then sent off to the RSN for assessment. I was awarded the Certificate with Merit in June 2025 with an overall mark of 89.2%. More detail about the individual modules, some of the comments from the Assessors and marks can be found below.
CERTIFICATE Module 1 - Jacobean Crewelwork
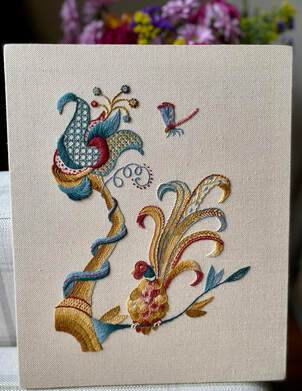
My first challenge was to come up with my own original design based on traditional Jacobean designs, which often include a Tree of Life and one or more animals or insects. Tendrils are also a common feature. The images do not have to be to scale and are often exaggerated for effect. Once my design had been agreed, I worked on stitch and colour plans before finally starting the actual embroidery, which is worked on linen twill with Appleton's crewel wools. The work was done on a slate frame. There are two main colourways in different shades, with a couple of accent shades (in my case red & pink). I have used over 20 stitches in this work (some are obligatory), including trellis work, block shading, burden stitch, raised stem band, padded satin stitch, satin stitch raised chain band, buttonhole stitch, long & short stitch, bullion knots, cretan stitch, fly stitch, feather stitch, vandyke stitch, laid work, French knots, seeding, feather stitch, whipped & woven wheels & stem stitch.
Assessment Result: 93% Some Comments from the Assessors: An unusual design for Jacobean crewel, but all the elements have been included and the design has a personal feel. There is a good understanding of all the different stitches, together with a good colour palette. Perhaps some larger areas could have been included to work stitches such as laid work and long and short. The gold colour range is rather dominant in many of the areas and there is a little overuse of the accent colour (I think there is a reasonable amount of long and short stitch. I have only used laid work on the insect though. I was happy with my use of colour in the piece.) The stitch tension is consistent and smooth throughout. Parallel stitches are even across the shapes, particularly the satin stitch and trellis........always remember when working with long and short stitch that a small split stitch edge os included as this helps to present any nibbling at the edges as this has happened in the top left hand turnover of the flower (fair comment!) Dense areas of stitching cover the linen and appear smooth. A good understanding of gradual shading has been included in all elements of the design with points kept sharp as per the original design source. Although there are not any bubbles, the twill is quite loose. On the reverse the corners are very open and need further stitching (I totally accept this - my first attempt at mounting was not the best and this is where I lost most marks!)
Module 2 - Canvas Stitches
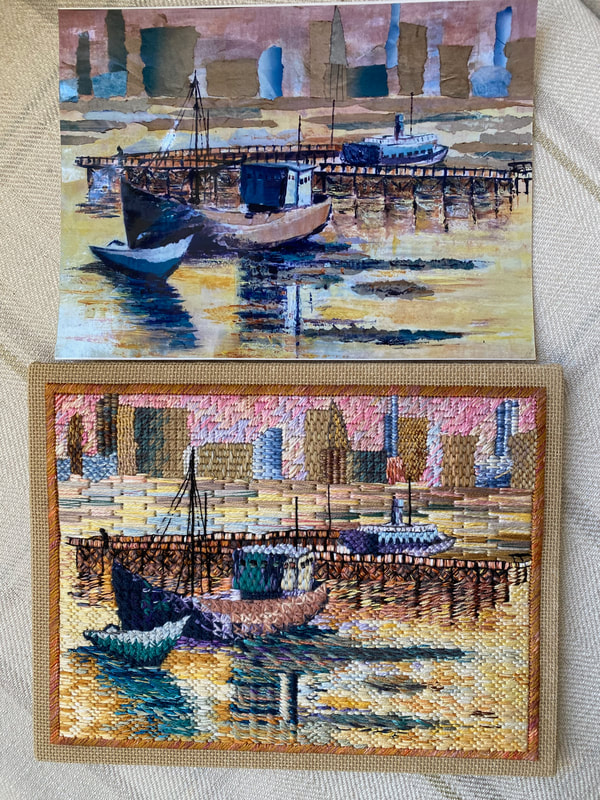
I began this module in May 2023 with canvaswork being more or less a new technique for me, The first task was to choose an image (A5) to copy and I decided to use a painting by my late mother of Gothenburg harbour (the painting is much bigger!). It's then about putting together a stitch plan, which can be quite challenging if you don't know canvas stitches. So I set about working a sampler of 36 different stitches using a large variety of threads, also experimenting with shading. Unlike many other types of embroidery, the foreground is worked first so I started with the boats and then moved on to the water and the pier. After working the smaller boat, I stitched the water in the background using a variation of Florentine Stitch and after working on the buildings, I finished the sky in a Milanese stitch. The rigging on the boats was stitched in afterwards.
Assessment Result: 90% Some Comments from the Assessors: This is a striking image with a colourful palette. It is a lovely tribute to your mother's painting and shows a good understanding of shading, texture and stitch blending. Congratulations on gaining a Distinction. A good variety of stitches have been included. They are mostly appropriate in scale and texture but the Florentine variation is a little long and doesn't always lie consistently flat (I should have made more use of a Mellor here to help the threads lie flatter) The stitch transitions in the water foreground has worked very well and reflects the original painting well. Take care to cover all canvas when butting stitches up against one another, working half stitches where necessary as there are several areas in the building/skyline section where canvas can be seen (I accept this but fortunately I can't see the canvas that is showing with the naked eye!) The canvas is taut with no bubbles. On the reverse the corners are a little gappy and need more accurate folding and mitring into the points. The sateen is extremely loose and the rebate a little uneven (my mounting has not improved much!)
Module 3 - Silk Shading 
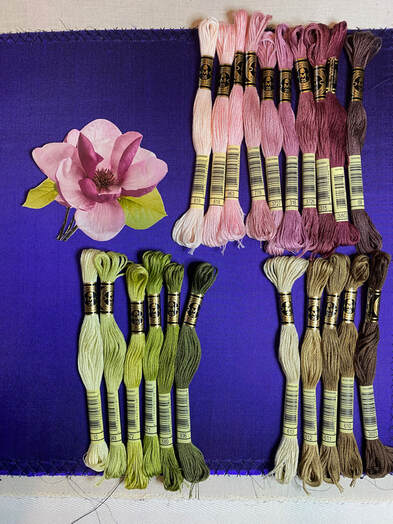
For this module, it is obligatory to choose either a flower head or fruit to embroider, and so I chose this pink magnolia as my subject. I started the module in January 2024 and after choosing my threads, I made colour and pencil drawings of the subject and also sampled the colour shades. I applied silk to a calico background and transferred the design to the silk using the prick & pounce method painted on with watercolour paint. I used one strand of DMC thread with a no. 12 crewel needle. The stitch is long and short stitch, except for the centre, where I have mainly used bullion knots.
Assessment Result: 86% Some Comments from the Assessors: This is a challenging subject with many petals and turnovers, particularly the internal cupped petals. The treatment of the stamens have been well worked and create a good texture. Well done. The background fabric is rich and suitable. Some of the thread shades selection do not have the same intensity of the original source image, richer plums for the darker areas and a deeper green range would have been helpful. (I wanted to get more intensity of colour in the centre of the flower so maybe a richer plum colour would have helped. I was totally happy with the green shades). There are no long and short stitches overlapping at the edges but there are a few split stitches visible along the edges of some petals. The proportions are not marrying up with the pricking, particularly the top edge of the left hand leaf which has changed the shape of the leaf. The edges of the long and short are well defined against the colour of the background fabric. (I really hadn't noticed that I had changed the shape of the leaf a little - mine is slightly more pointed on the top edge compared to the original!) The turnovers and left leaf could have demonstrated more of a roll in the angle to emphasise the shaping. (Fair comment!)
Module 4 - Goldwork The design for this module is based on a Wattled Crane that we observed in Africa with 'imagined' wings! I started the embroidery in September 2024 - again it is worked on silk with a calico background and watercolour paint is used to paint on the design. Layers of felt and soft string have been applied to selected areas. Japanese gold thread is stitched in pairs and this has been applied on some of the felted areas, as well as directly onto the fabric in one area. There are other areas of mixed couching - that means a combination of rococo, twist and Japanese threads. They are couched down in pairs in a 'brick' pattern. There are a number of outlines worked in couched pearl purl wire (which has to be very slightly stretched to allow the thread to go down in-between the 'pearls'), and some of these have been filled with 'chipping' - that is tiny pieces of bright check thread, which is hollow, and cut into square shapes, then applied in random directions. The soft string areas have been covered with cutwork - pieces of smooth purl hollow wire cut to size.
Assessment Result: 88% Some Comments from the Assessors: This is a dramatic design with a lot of movement. We can see improvement in technique across the piece and the addition of scattered chips at the feet have grounded the design nicely. A very good first impression. Well done. The couching stitches have been worked in the traditional bricking pattern throughout. The stitches generally lie at 90 degrees to the gold threads but the spacing is a little inconsistent in places..... the rows are overlapping in a few areas but there is no felt visible between rows. The Pearl Purl is nicely pulled and generally sewn invisibly but there are a few kinks where the thread has pulled across at the wrong angle. The cutting and joins have been well managed. (I agree that there are some inconsistencies - I found it quite difficult to see the stitches at times!). The chipping is cut to a good size but there are a few tags standing proud..... the cutwork has the occasional slightly short length but is generally covering and hugging the soft string padding accurately. The angles flow well but a few gaps between chips expose the padding underneath The required length of cutwork has been worked with minimal damage or cracking. Well done. (All fair comments - I couldn't see any gaps within the chipping, although I'm sure they are there!). The board has been cut accurately and the wadding placed evenly across the board to the edges....... there are several bubbles and ripples within the design area although the silk is fairly taut. Please remove all pin pricks from the edge of the board. On the reverse the corners are neatly mitred and the sateen has been applied well. (My mounting has improved in some areas although I am annoyed with myself about the bubbles that appeared. After pinning the fabric to the board, it's important to leave the fabric to relax before tightening it again. I did leave it for 3 or 4 weeks but this clearly wasn't long enough (I was under a deadline!). There were no bubbles when it was sent off for assessment but there are now. I have re-mounted the piece.
DIPLOMA
Module 1 - Blackwork
In March 2025 I began the Blackwork module which will become part of the Diploma. A black and white image has to be used and I took this photograph of Mount Rushmore some years ago, which I think lends itself beautifully to blackwork, with lots of shading possibilities. The picture is to be worked on 36 count white linen with a range of black threads. The process is that the main lines of the design are traced onto tissue paper and then tacked onto the linen (see below). I've started on the trees (as in canvas work, the foreground is usually stitched first) and am now moving on to the rocks/scree. I've also sampled the rock face which I will shortly be starting. It is important to do lots of sampling as the stitches are not easy to remove and leave a black residue!